Some times some of the best BMX skate parks or spots aren’t in your local area. This will require you to travel by car with your bike.
Within this article, I have brought together the most useful guide full of tips and tricks whilst travelling on trips to your favourite areas to ride BMX.
Additionally, I will note the best methods of transporting your BMX bike by car. Moreover I will describe different practical issues you might face on the way, travelling by car.
Table of Contents
Methods Of Transporting Your BMX By Car
Before transporting your BMX by car, you’ll probably need to think about a few factors as you plan your trip:
- Do you want to transport you BMX outside the car on a rack or inside in your car?
- If you choose the option of a outside rack, would you need a rooftop or boot/hatchback rack?
- How will you protect your BMX from scratches and dings whilst inside/outside the car?
In the boot
If you’re considering of transporting your BMX bike in the boot of your car, this may be a wise and simple fix. This is because if your car is big enough, why not?
Additionally this may be a more secure method, opposed to to having your BMX bike on the outside of your car which means its prone to being stolen by thief’s more easily.
If you would prefer this method of transporting your BMX bike by car, we’d heavily recommend you to purchase a BMX Travel Bag. This is because it hides your BMX from plain view and prevents scratches or dirt from your BMX bike damaging the inside of your car.
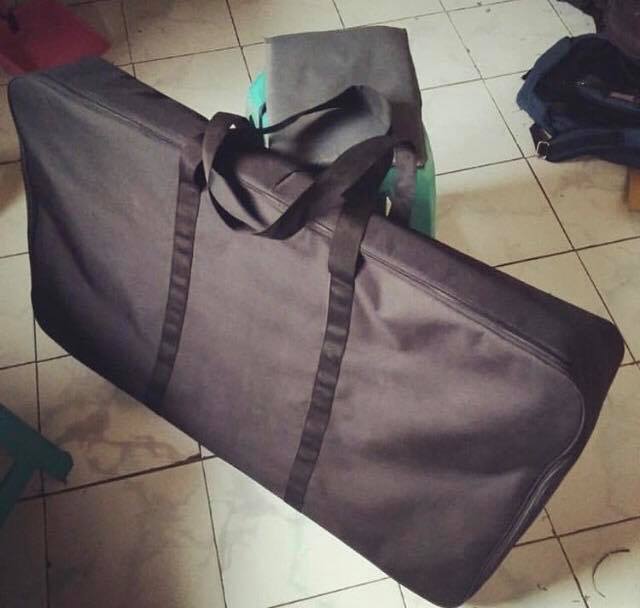
Moreover, as you can read in the BMX travel bag article you’ll find that they offer other practical features. These features include interior storage pockets for BMX parts and rollers on the bag which makes travelling more convenient with your BMX.
Car Racks
If you’d prefer to transport your BMX bike on the outside of your car you have multiple different types of racks such as; a roof rack, boot/hatch rack and a Towball rack.
Below I will list of the various types of BMX car racks with their pros & cons.
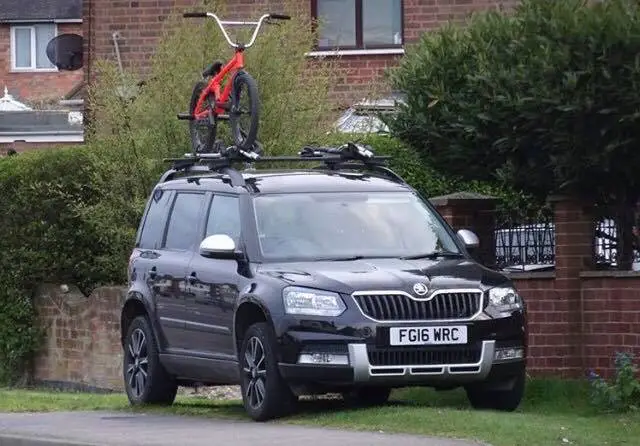
Bike Roof Rack
The most common method of carrying BMX bikes is through using a roof rack. This is when a rack is mounted on top of your roof and your bike is simply placed on top securely in position.
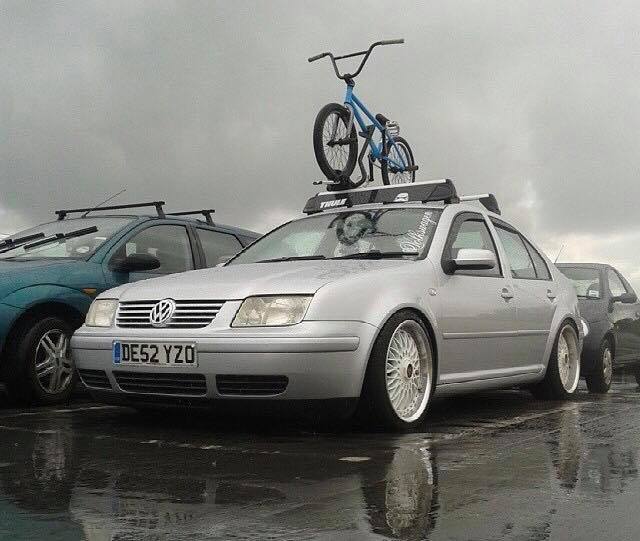
Most designs will require you to remove the front wheel, although some will have an extra connection arm point. This will allow you to connect the frame of your bike, enabling you to take it as a complete BMX bike.
Pros
- There is a large amount of room available on the roof, so carrying a larger quantity of BMX bikes is feasible.
- Your BMX bikes will not damage areas of your car such as Paint work
- Does not effect trunk space
- All types of bikes are compatible with these, such as mountain and road bikes
Cons
- Extra security for bikes is need to prevent theft as the bikes are exposed on the outside of the car
- Low ceilings in car parks or garages could be a cause for concern
- A lot of air drag whilst driving, could increase fuel consumption
- Difficult to load if you’re a smaller build
- Bikes can get very dirty and potentially damaged
A car boot rack is other most common way of transporting a BMX bike outside of your car, as it’s a very convenient and simple method.
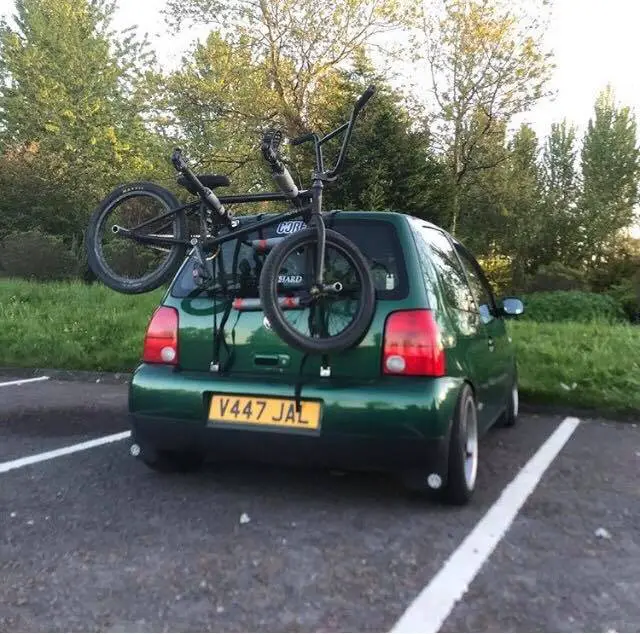
This is because a car boot rack is held on with straps with hooks that slide into the edges of a boot lid. Then there should be padding where it will rest on the car and some arms for your BMX bikes to rest on.
Some more upper market models of a car boot rack will have cradles on the arms for the BMX bikes, to ensure they’re more secure.
Pros
- Simple to use
- More affordable option
- Less effect on air drag then a roof rack, better fuel efficiency
- Folds for storage whilst not in use
- Quick to install and remove
- Extra security needed for bikes as its outside of the car, which makes it prone to thief’s
- Easily damage paint work if not setup properly
- Blocks number plate and lights – could be a problem with police
- difficult to ensure that bikes are secure
- Restricts boot access as rack is resting on it
Additionally, a towbar rack has handy electrical components and a number plate that will allow them to be visible compared to the car boot rack, whereby they were obscured.

Moreover with a car towbar rack, typically you can hold up to four bikes within a cradle which boosts convenience if you’re travelling with friends. It also has higher arms to grab on the bike frame for greater stability .
Pros
- Secure connection to your car
- Similar fuel consumption to a boot rack, no where near as bad as a roof rack
- Easy to assemble and disassemble
- Easy to store when not in use
- Includes lights and number plate mount – less problems with police
- Solid construction when compared to a boot rack
Cons
- Most importantly – you need a towbar!
- Designs that do not fold can be too large to store
- Extra security needed for bikes as its outside of the car, which makes it prone to thief’s
- Can be heavy to use
- Less budget option out of all suggestions
Top Tips Whilst Transporting Your BMX By Car
BMX Pegs
How To Remove Your BMX Pegs
- Firstly you’ll want to find a 17MM deep socket with a ratchet + extension
- Then you’ll want to insert this into the peg from the outside
- The socket should fit just over the nut on the axle
- Keep twisting the socket until you feel it connect with the axle nut
- Then turn the socket counterclockwise to loosen the nut on the axle.
- This should then be able to be removed.
- Then it should allow you to remove the peg
- You then need to reattach the nut back onto the axle and tighten it again
BMX Chain
Conclusion
Overall there are many methods out there to transport your BMX by car. Choose the option that is most convenient to your needs and that suits your situation best.
For instance if you go on solo trips, transporting your BMX inside your car could be a better option. Where as if you’re travelling with friends maybe a roof rack or a towbar rack is the better option to allow for more riders per car.
Just ensure that you follow our simple tips to ensure there are no problems or accidents on the way.
Leave a Reply
You must be logged in to post a comment.